
Module 1 - Introducing Python
What is Python?
Python is a high-level programming language that is designed to be versatile and applicable to various tasks. Being a high-level languageA programming language that provides abstractions and features to simplify coding compared to lower-level languages. means that it provides abstractions and features that make it easier for programmers to write code compared to lower-level languages. Python's design philosophy emphasizes code readabilityA design philosophy emphasizing clear and understandable code structure in Python., which means that the code is structured in a way that is easy to understand and follow.
One distinctive feature of Python is its use of significant indentationPython's use of indentation to define code blocks, enforcing a consistent and readable structure.. This means that the indentation of code blocks using spaces or tabs is not just for aesthetics but has semantic meaning. The off-side ruleThe principle behind significant indentation, ensuring a consistent and readable code structure., which is the principle behind this indentation style, enforces a consistent and readable structure in the code.
Python's language constructs and its support for object-oriented programming (OOP) help developers write code that is clear and logically organized. OOP is a programming paradigm that structures code around objects, which are instances of classes containing data (attributes) and behavior (methods). This approach promotes modular and reusable code.
Python is dynamically typedVariable types are inferred at runtime, providing flexibility in programming., which means that variable types are inferred at runtime rather than being explicitly declared. This allows for flexibility in programming and makes it easier to write and modify code. Additionally, Python has garbage collectionAn automatic memory management feature in Python, handling memory allocation and deallocation., which automatically manages memory allocation and deallocation, making it more convenient for programmers as they don't have to manually manage memory.
Python supports multiple programming paradigmsApproaches to programming styles, including structured, object-oriented, and functional programming., including structured (procedural), object-oriented, and functional programming. This means that developers can choose the paradigm that best suits their needs and combine different approaches within the same codebase.
Python is often referred to as a "batteries includedPython's comprehensive standard library providing pre-built functionality for various tasks." language because it comes with a comprehensive standard library. The standard library provides a wide range of modules and packages that offer pre-built functionality, making it easier to accomplish various tasks without having to write code from scratch. This feature enhances productivity and reduces the time required to develop applications.
Overall, Python's design choices, including its readability, support for different programming paradigmsApproaches to programming styles, including structured, object-oriented, and functional programming., and extensive standard library, aim to enable programmers to write clear and concise code for both small and large-scale projects.
Python has a large and active communityA group of users and developers actively involved in using and improving Python. of users and developers. It is used in a wide variety of domains, including web development, data science, machine learning, artificial intelligence, and scientific computing.
Here are some of the benefits of using Python:
- Python is easy to learn. Its syntax is similar to the English language, and it has a large number of libraries and tutorials available online.
- Python is powerful. It can be used to create a wide variety of applications, from simple scripts to complex web applications.
- Python is versatile. It can be used for a variety of tasks, including data analysis, machine learning, and scientific computing.
- Python is open source. It is freely available to use, modify, and distribute.
- If you are looking for a powerful, versatile, and easy-to-learn programming language, then Python is a great choice.
Here are some of the things you can do with Python:
- Web development: Python is a popular choice for web development, thanks to its large number of web frameworks and libraries.
- Data science: Python is a powerful tool for data science, thanks to its libraries for data analysis, machine learning, and artificial intelligence.
- Scientific computing: Python is a popular choice for scientific computing, thanks to its libraries for numerical analysis, scientific visualization, and simulation.
- Software development: Python is a general-purpose language that can be used to develop a wide variety of software applications.
- System administration: Python can be used to automate tasks, such as deploying software, managing servers, and monitoring systems.
- Education: Python is a popular language for teaching programming, thanks to its simple syntax and its large number of educational resources.
Where Did Python Come From and How Popular is it?
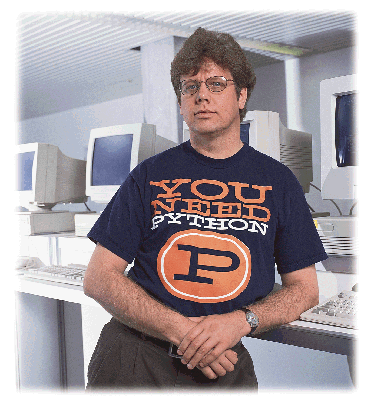
The Python programming language was created in the late 1980s by Guido van RossumThe creator of the Python programming language. at Centrum Wiskunde & Informatica (CWI) in the Netherlands. Van Rossum was looking for a new programming language that was easy to learn and use, and that was also powerful and versatile. He was inspired by the ABC programming language, and he wanted to create a language that was even better.
Van Rossum began working on Python in December 1989, and the first release of the language was made available in February 1991. Python has since become one of the most popular programming languages in the world, and it is used by a wide range of people, from students and hobbyists to professional developers.
Here is a brief history of Python:
- 1989: Guido van RossumThe creator of the Python programming language. begins working on Python.
- 1991: The first release of Python, Python 0.9.0, is made available.
- 1992: Python 1.0 is released.
- 1995: Python 1.5 is released.
- 2000: Python 2.0 is released.
- 2008: Python 3.0 is released.
- 2020: Python 3.9 is released.
Here are some specific stats as of January 2021 on Python usage and growth:
- Python is the most popular programming language in the world, according to the 2021 Stack Overflow Developer SurveyAn annual survey indicating Python's popularity and usage statistics among developers..
- The number of Python developers has increased by over 300% in the past five years.
- In 2021, there were over 11 million Python developers in the world.
- The number of Python developers is expected to grow to over 20 million by 2025.
- Python is the most popular language for data science, with over 70% of data scientists using it.
- Python is also the most popular language for machine learning, with over 60% of machine learning engineers using it.
- Python is a great language for beginners, with over 40% of beginners learning Python as their first programming language.
Check out this chart showing Python's growth relative to some of the other more popular languages in recent years:
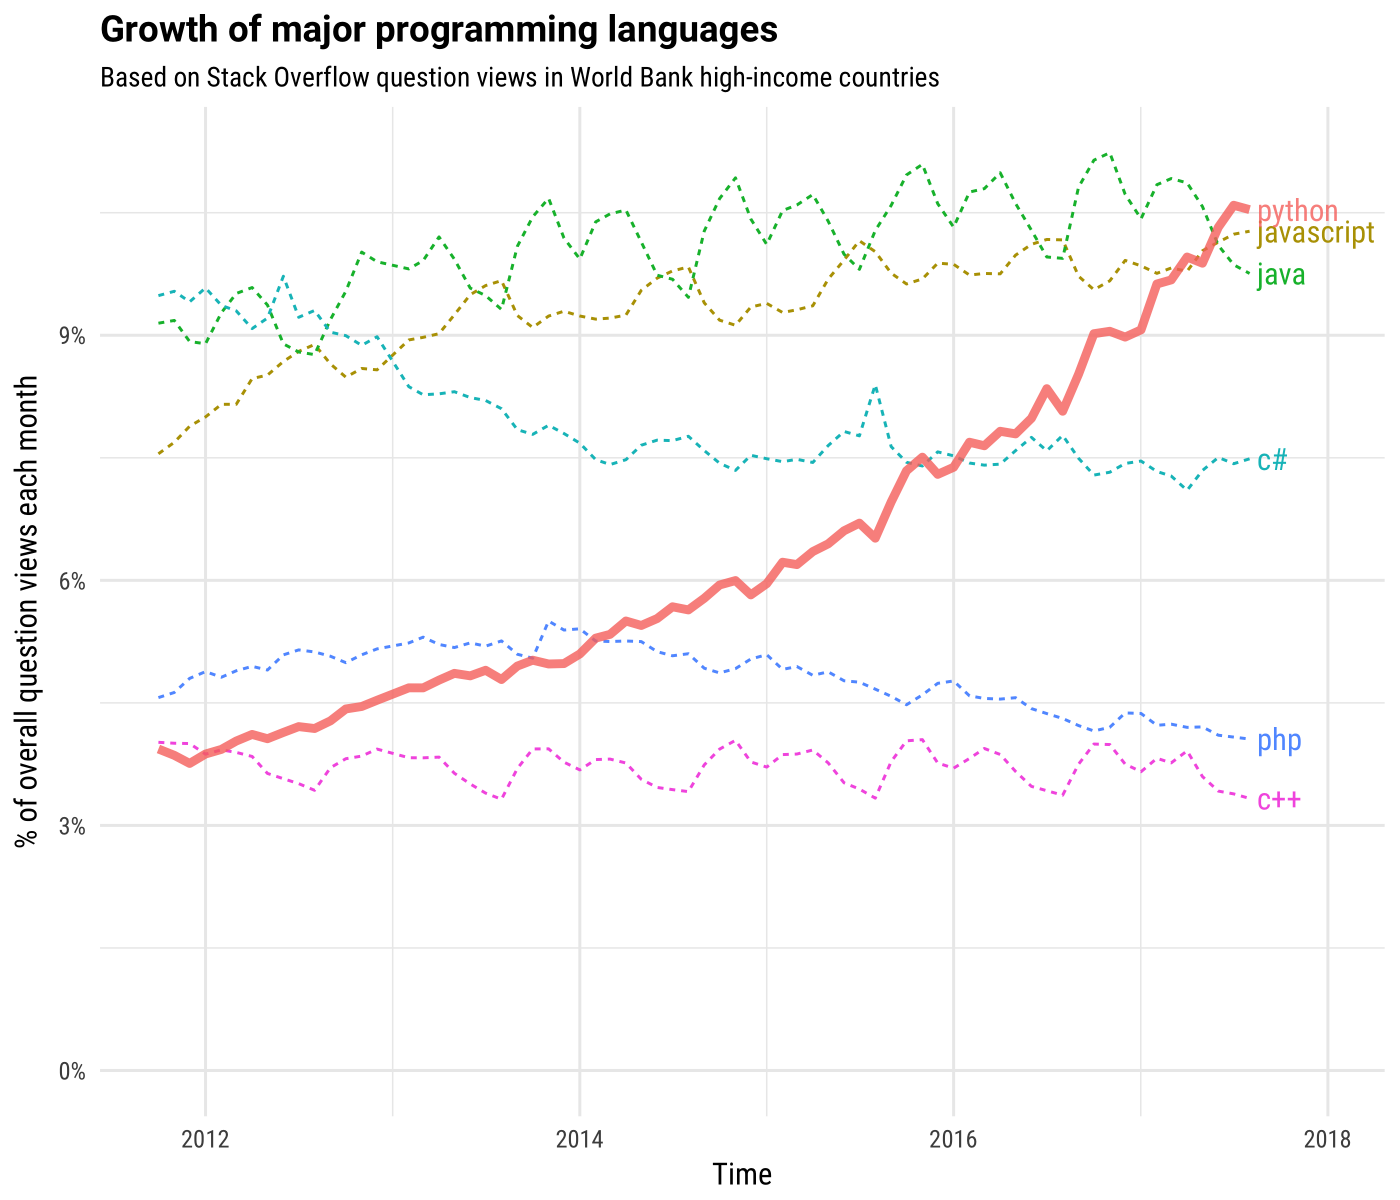
This image is from the linked article on the Stack Overflow blog - Click here to read more
Installing Python - Windows
To install Python on a Windows computer, you can follow these steps:
- Visit the official Python website: Go to the Python website at python.org in your web browser.
- Download the Python installer: On the Python website's homepage, locate the "Downloads" section. Click on the "Download Python" button to access the download page.
- Choose the Python version: On the download page, you'll see different versions of Python available for download. Select the latest stable release suitable for your Windows operating system. Choose between 32-bit or 64-bit depending on your system architecture. Most modern Windows systems use the 64-bit version.
- Start the installer: After downloading the Python installer, locate the downloaded file (e.g., python-3.X.X.exe) and double-click on it to start the installation process.
- Customize the installation (optional): On the installer's first screen, you'll see options to customize the installation. You can choose to add Python to the system PATH, which allows you to run Python from any command prompt. This is recommended to enable easy access to Python from the command line.
- Select installation options: On the next screen, you can choose the components you want to install. Typically, the default options are sufficient for most users. Make sure the "pip" package manager is selected, as it is essential for installing Python packages.
- Choose the installation location: On the next screen, you can select the destination folder for Python installation. The default location is usually fine, but you can choose a different folder if needed.
- Begin the installation: Click the "Install" button to start the installation process. The installer will copy the necessary files and set up Python on your computer. This process may take a few minutes.
- Complete the installation: Once the installation is complete, you'll see a screen confirming the successful installation of Python. You can optionally choose to disable the "Add Python to PATH" option if you didn't select it earlier. This can be done manually later if needed.
- Verify the installation: Open a command prompt by typing "cmd" in the Windows search bar and selecting the "Command Prompt" application. In the command prompt, type "python --version" and press Enter. You should see the installed Python version displayed, indicating that the installation was successful.
- Python is now installed on your Windows computer, and you can start writing and running Python code. You can use any text editor or IDE of your choice to write Python programs. Additionally, you can install additional packages and libraries using the pip package manager to enhance your Python development environment.
Installing Python - Apple
To install Python on an Apple computer (Mac), you can follow these steps:
- Check for pre-installed Python: Macs often come with a pre-installed version of Python. Open the Terminal application (found in the Utilities folder within the Applications folder) and type "python3 --version" (without quotes) and press Enter. If you see a Python version displayed (e.g., Python 3.X.X), it means Python is already installed, and you can skip to step 6. If not, proceed to the next steps.
- Visit the official Python website: Go to the Python website at python.org in your web browser.
- Download the Python installer: On the Python website's homepage, locate the "Downloads" section. Click on the "Download Python" button to access the download page.
- Choose the Python version: On the download page, you'll see different versions of Python available for download. Select the latest stable release suitable for macOS. Choose between the 64-bit or 32-bit version, depending on your Mac's architecture. Most modern Macs use the 64-bit version.
- Start the installer: After downloading the Python installer, locate the downloaded file (e.g., python-3.X.X-macosX.X.pkg) and double-click on it to start the installation process.
- Customize the installation (optional): The installer will guide you through the installation steps. You can customize the installation options, such as the installation location and additional components to install. In most cases, the default options are sufficient.
- Install Python: Click the "Install" button to begin the installation process. You may be prompted to enter your administrator password to authorize the installation. The installer will copy the necessary files and set up Python on your Mac. This process may take a few minutes.
- Verify the installation: Once the installation is complete, open the Terminal application. Type "python3 --version" (without quotes) and press Enter. You should see the installed Python version displayed, confirming that the installation was successful.
- Set up command line access (optional): By default, the Python installer adds Python to the system PATH, allowing you to run Python from any Terminal window. If you encounter any issues running Python from the Terminal, you may need to manually add the Python executable to the PATH environment variable. This can be done by editing the .bash_profile or .zshrc file in your home directory and adding the appropriate PATH configuration.
- Python is now installed on your Mac, and you can start writing and running Python code. You can use any text editor or integrated development environment (IDE) of your choice to write Python programs. Additionally, you can install additional packages and libraries using the pip package manager to enhance your Python development environment.
Installing a Development Environment
You could create Python programs using some of the basic tools that are on your computer. However, it is strongly recommended that you download and use what's called an IDE, or Integrated Development Environment. An IDE helps you create Python scripts in less time and with fewer errors by helping you out in a number of ways. You can choose from several different IDEs available for your computer, but I will tell you that my favorite is a program called PyCharm.
PyCharm does a lot of things for you that would normally be much more difficult or time consuming. It also provides you with tools like a debugger, and it highlights problems in your code so you can fix them more easily.
Check out this video tour for more information on what PyCharm can do for you:
The best part about it is that PyCharm comes in a free-to-use version, called “Community Edition”, that does most of what you will need to do in order to get through the modules of this class. If you are a student with an accredited institution, you can also get a free license for the “Pro” version, which has more bells and whistles than most people will ever need.
Check out more information on these IDEs on the JetBrains web page
Let's Try It...
Below, you should see a mostly empty window. It's called a Jupyter Notebook, and you will see these throughout this textbook. These windows allow you to try out code in a safe place, right as you are learning about specific coding principles in Python. It won't replace an IDE like PycharmAn IDE for Python development, offering features like debugging and code highlighting., but it will work just fine for simple things.
Here are a few things to remember in these notebooks:
- To enter another line of code, press ENTER.
- To run the lines of code you have entered, hold SHIFT and press ENTER.
- To start over with a blank notebook, right-click on the notebook and choose “Restart Kernel”.
Let's try a very basic program by typing the following code into the notebook below and pressing SHIFT-ENTER:
print("Hello, World!")
When you run your code, you should see something like this in the window:
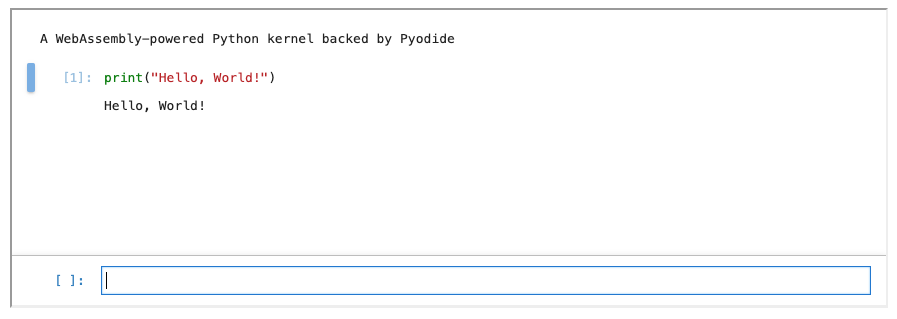
If you did, then you are well on your way to mastering Python!
The next step is to try the same code in your IDE. To do this in PyCharmAn IDE for Python development, offering features like debugging and code highlighting., follow the steps below.
Module 1 Video
Hello World in PyCharm
To run a "Hello World" program in PyCharm, you can follow these steps:
- Launch PyCharm: Open the PyCharm IDE on your computer.
- Create a new project: Click on "Create New Project" or go to "File" -> "New Project" to create a new project in PyCharm.
- Configure project settings: Choose a location for your project and give it a name. You can also select the Python interpreter you want to use for the project. If you haven't installed Python interpreter in PyCharm yet, you may need to configure it at this stage. Click on "Create" to proceed.
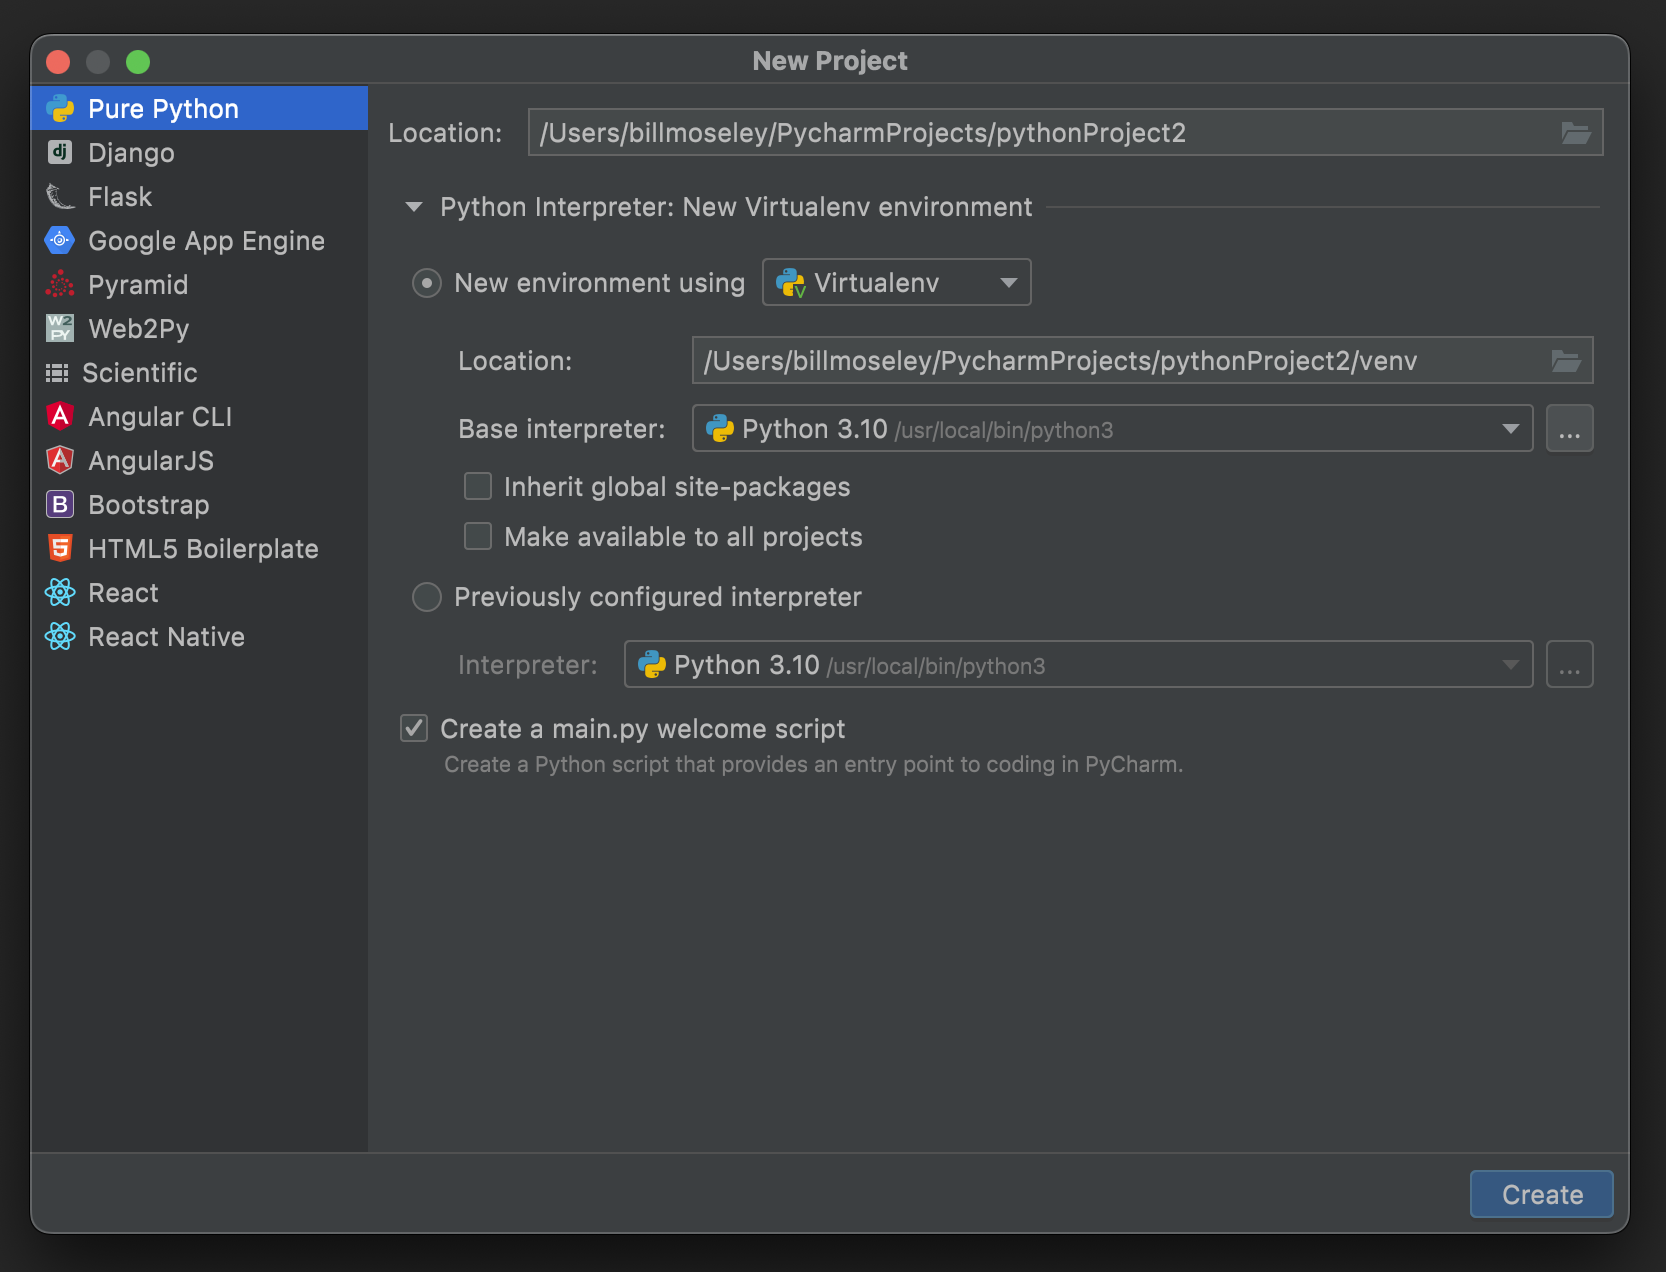
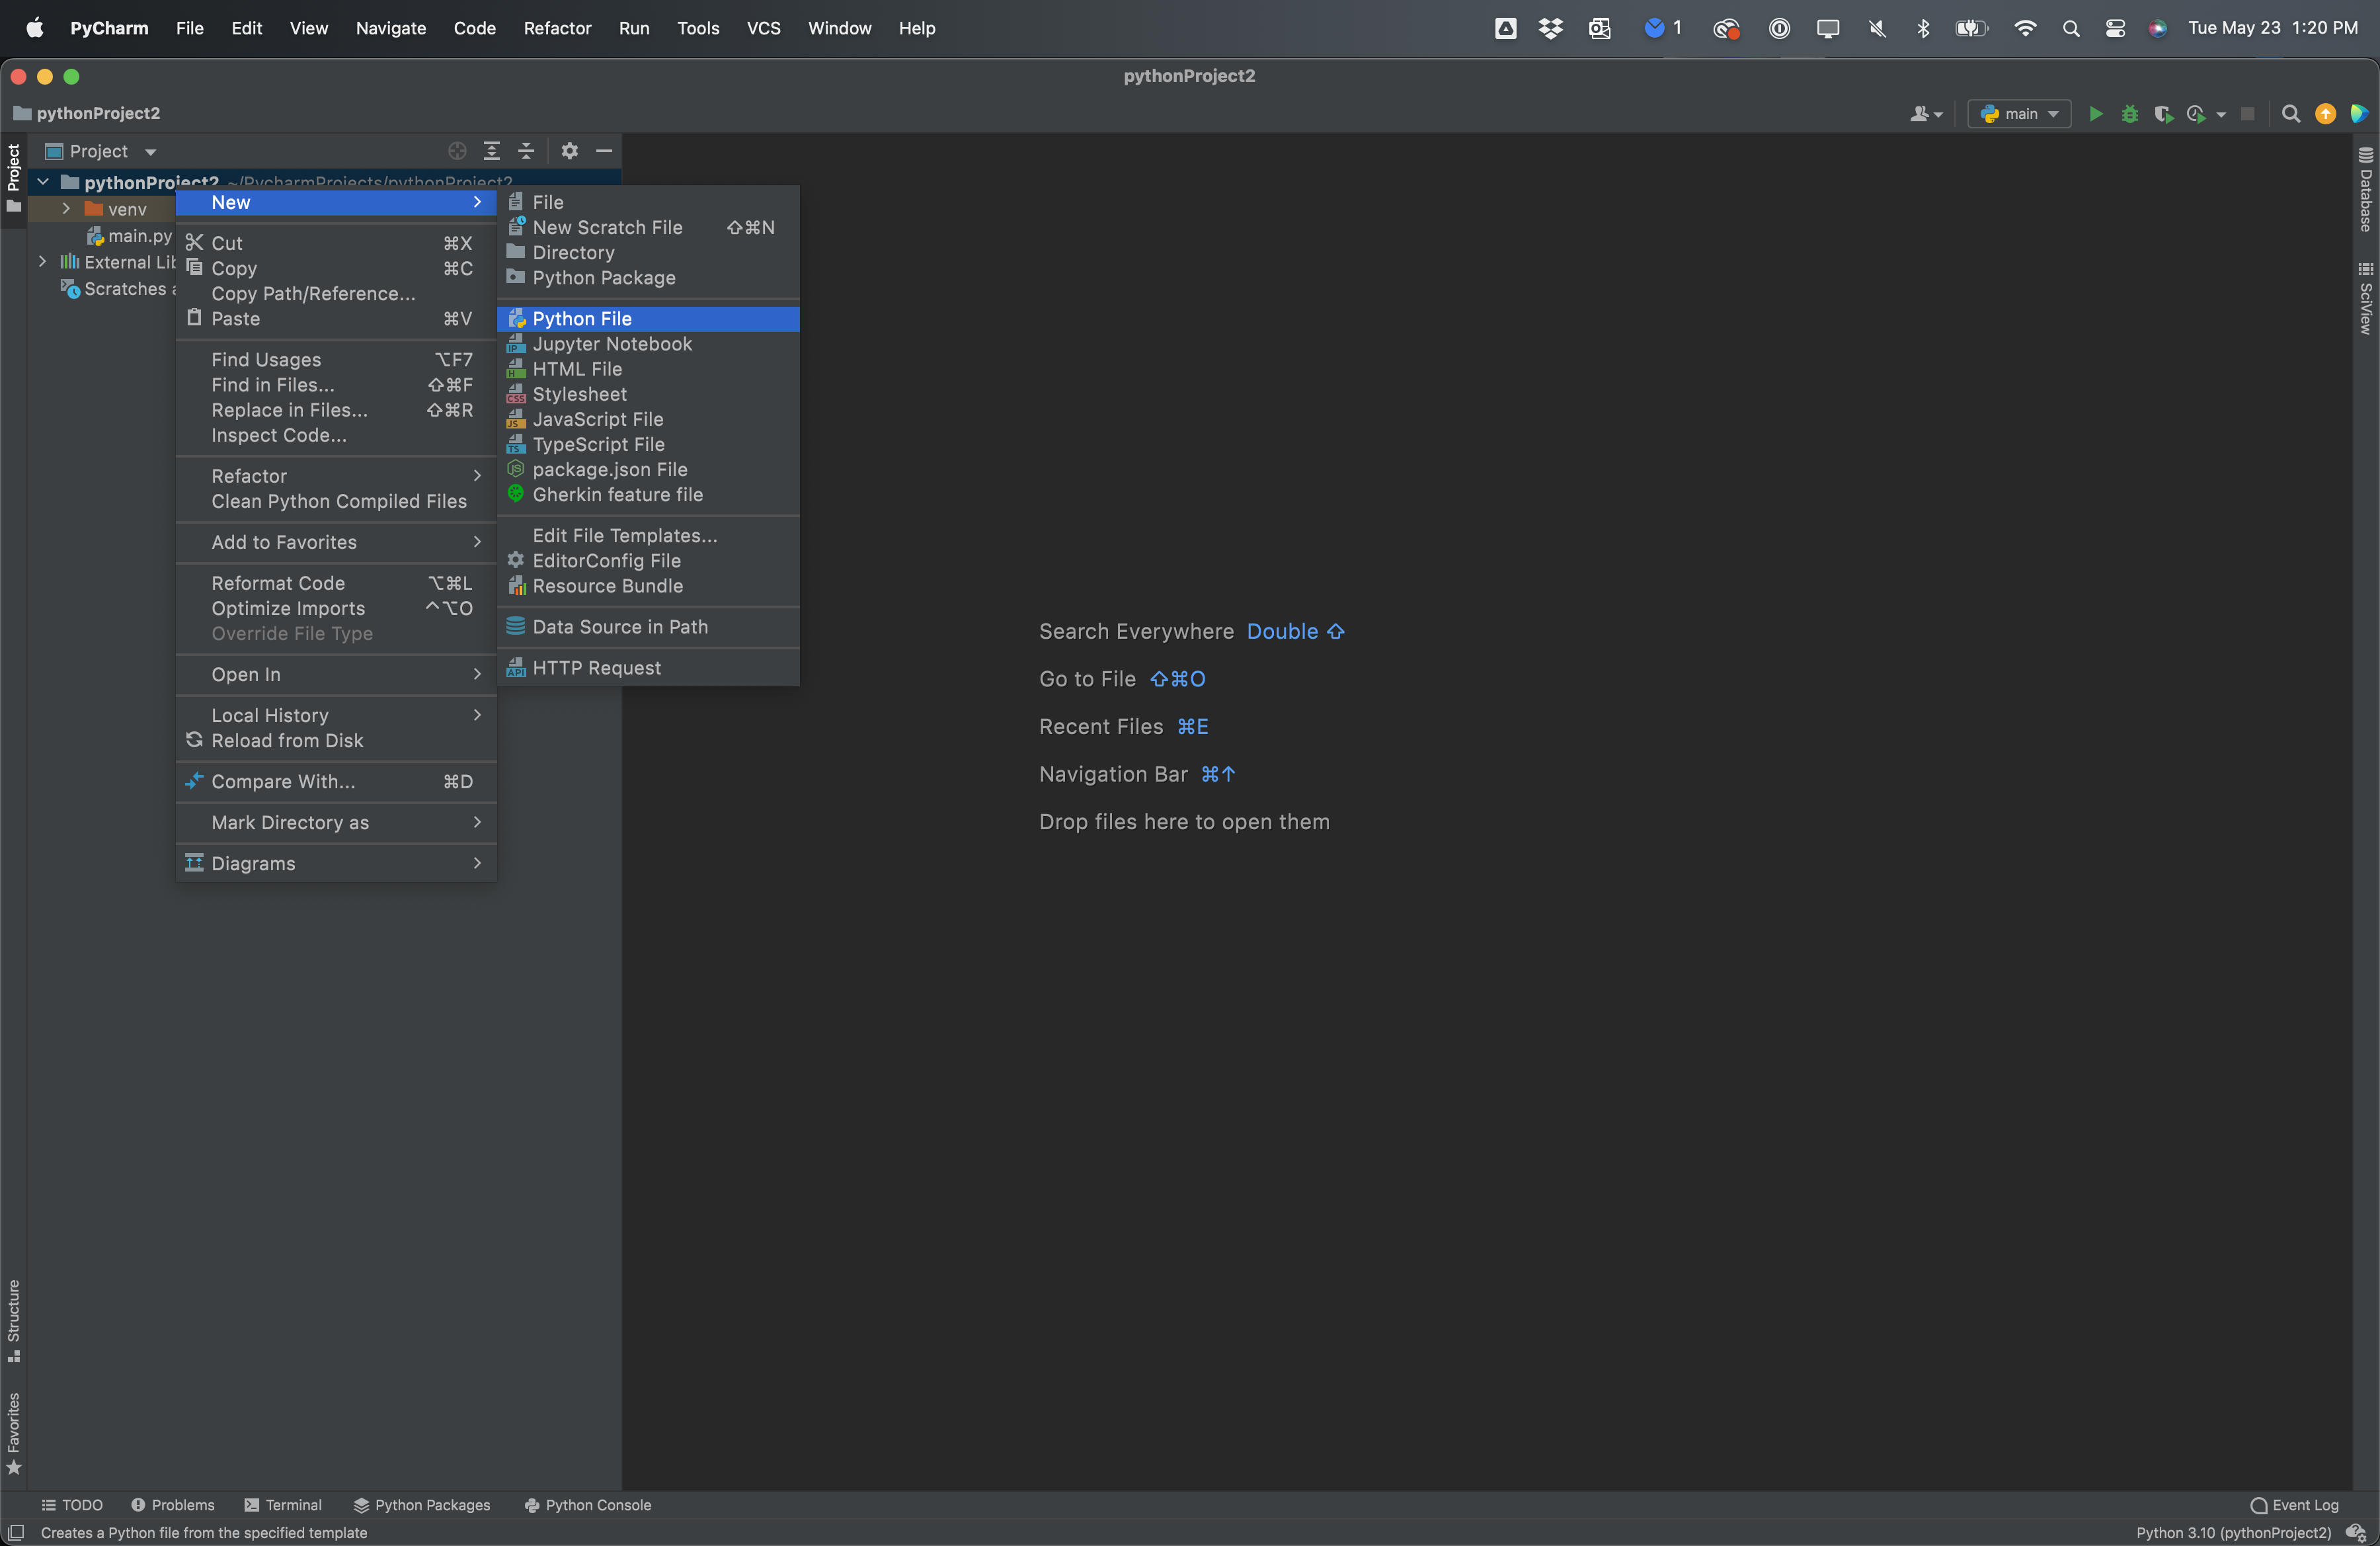
- Create a new Python file: In the PyCharm workspace, right-click on the project folder in the Project pane (usually located on the left side) and select "New" -> "Python File" to create a new Python file.
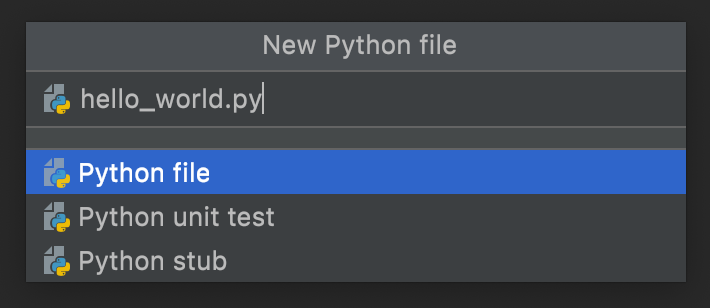
- Name the Python file: Provide a name for your Python file. For example, you can name it "hello_world.py". Press Enter to create the file.
- Write the "Hello World" code: In the newly created Python file, type the code from the practice block above.
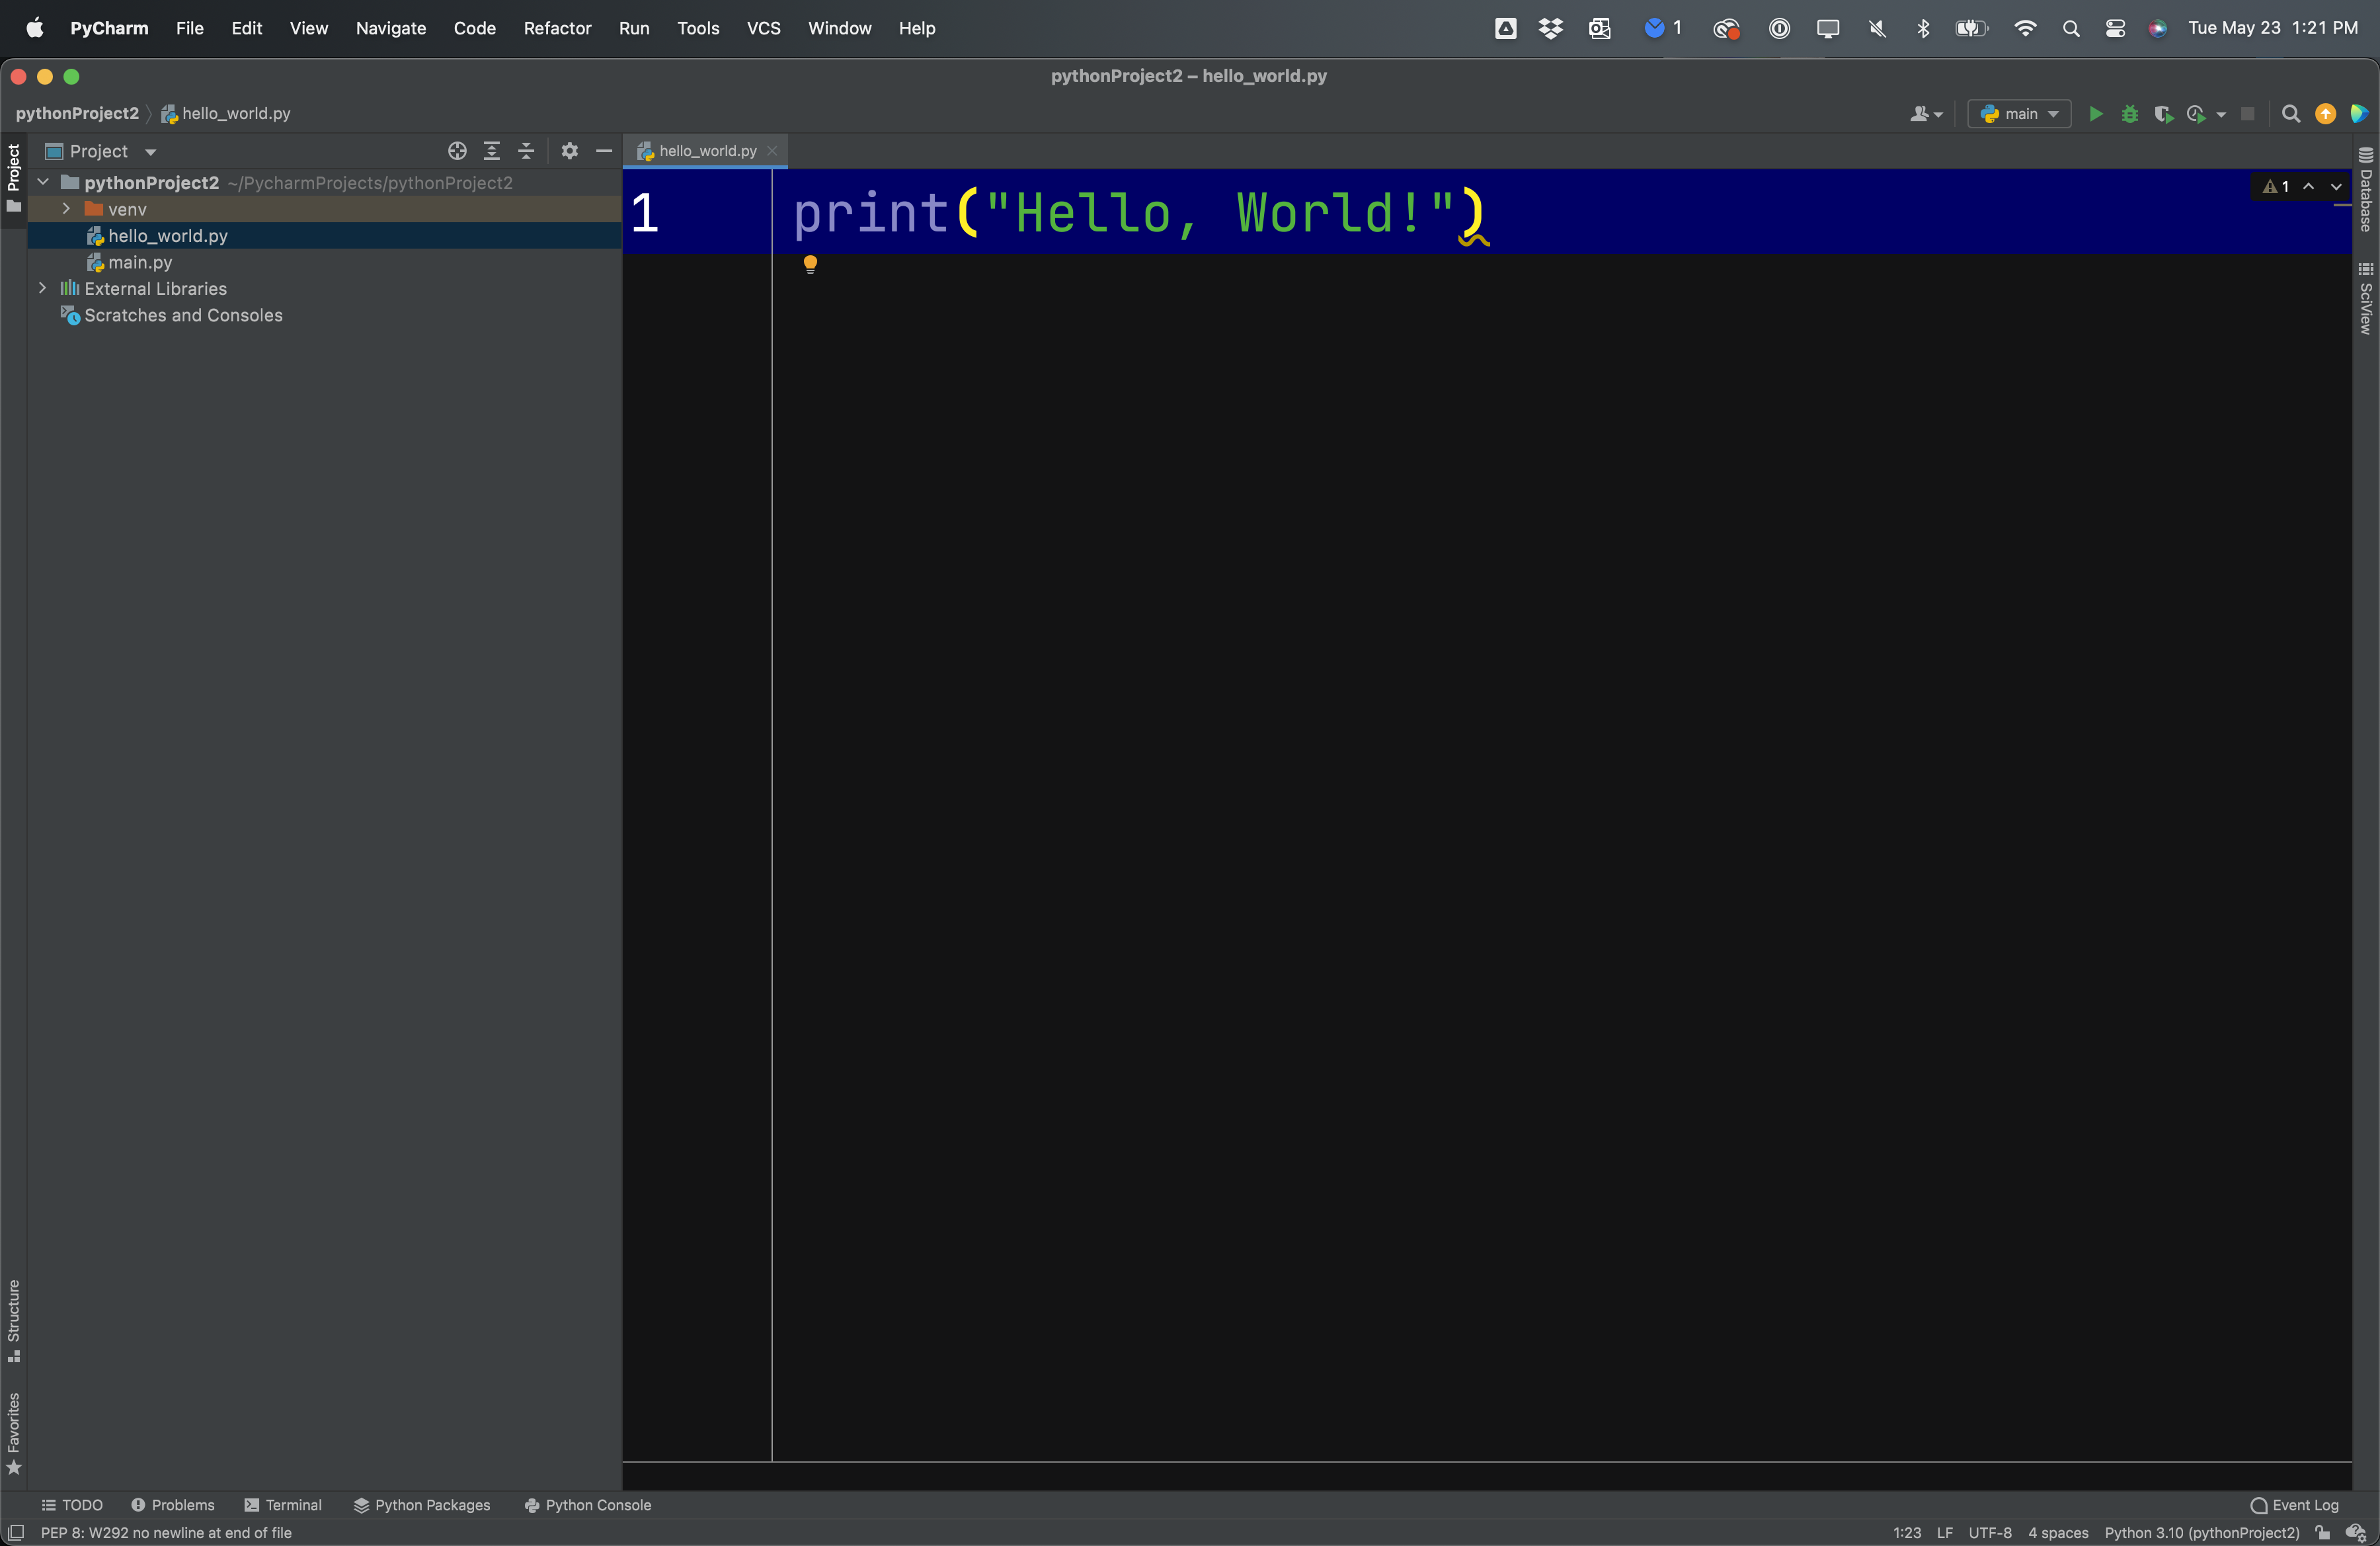
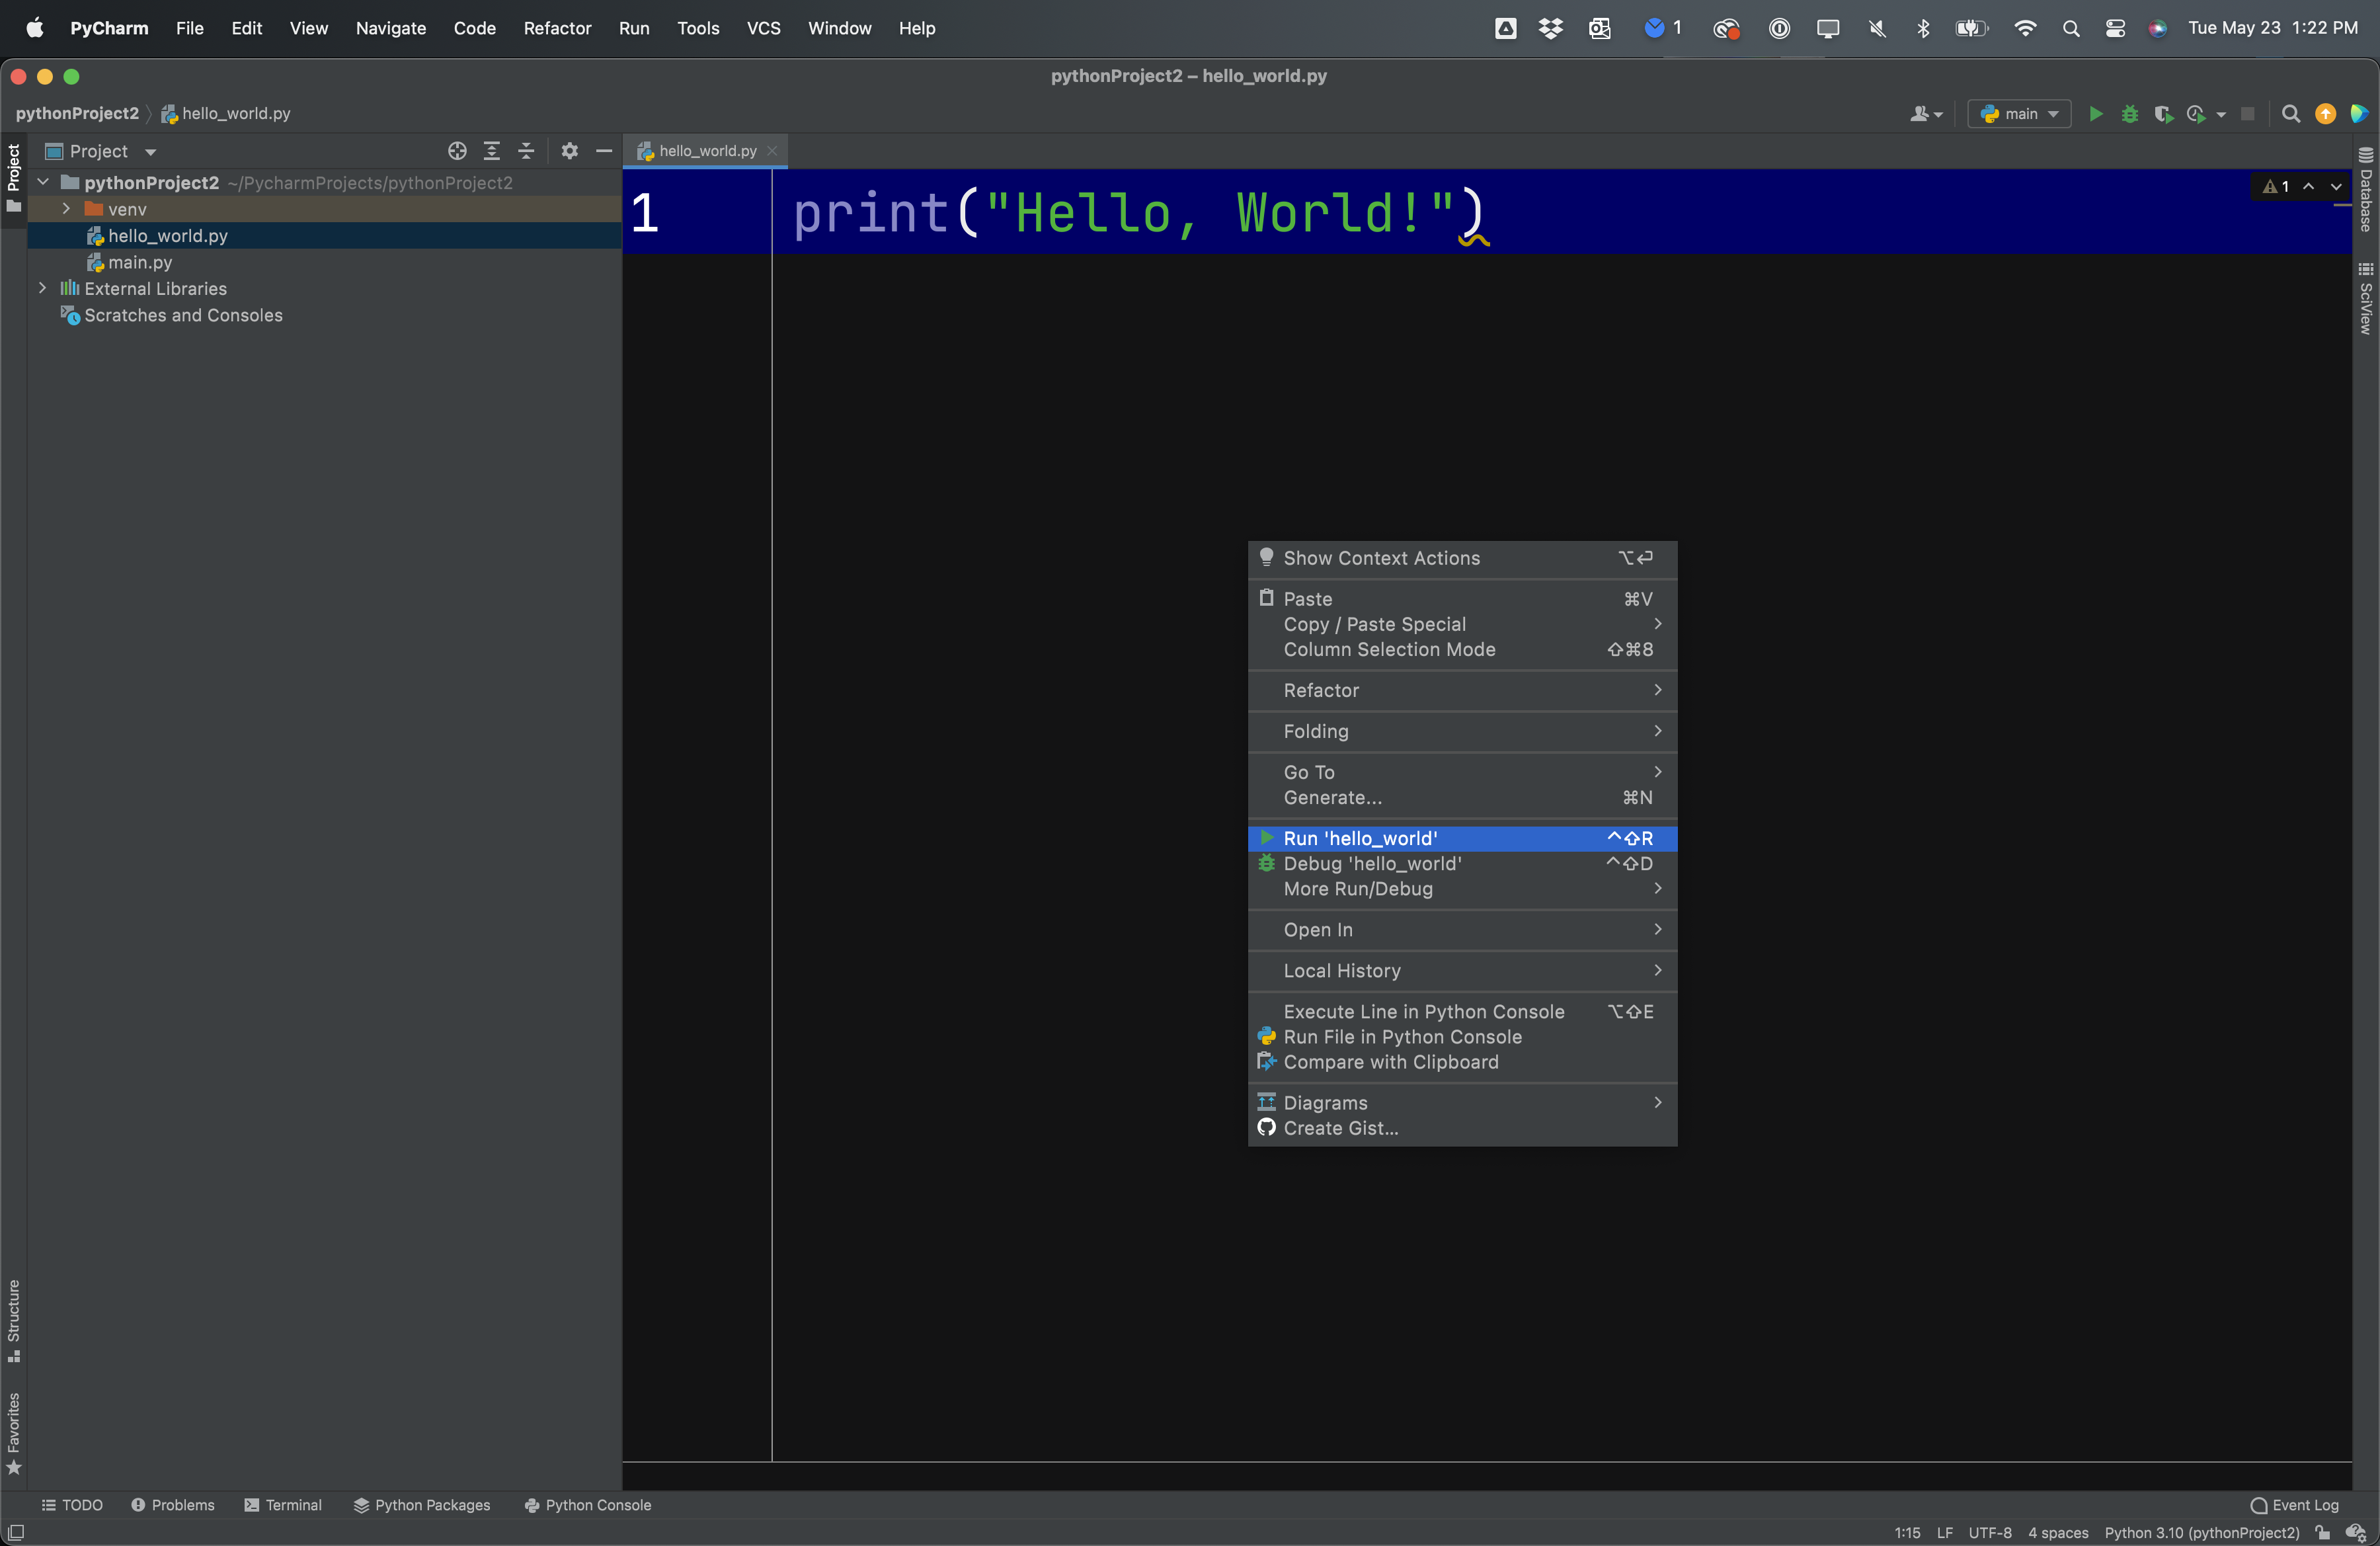
- Run the program: Right-click anywhere inside the editor window and select "Run 'hello_world'" from the context menu. Alternatively, you can use the keyboard shortcut Ctrl+Shift+F10 (or Cmd+Shift+F10 on Mac) to run the program.
- View the output: The output of the "Hello World" program will be displayed in the Run window at the bottom of the PyCharm interface. You should see the output "Hello, World!" printed in the console.
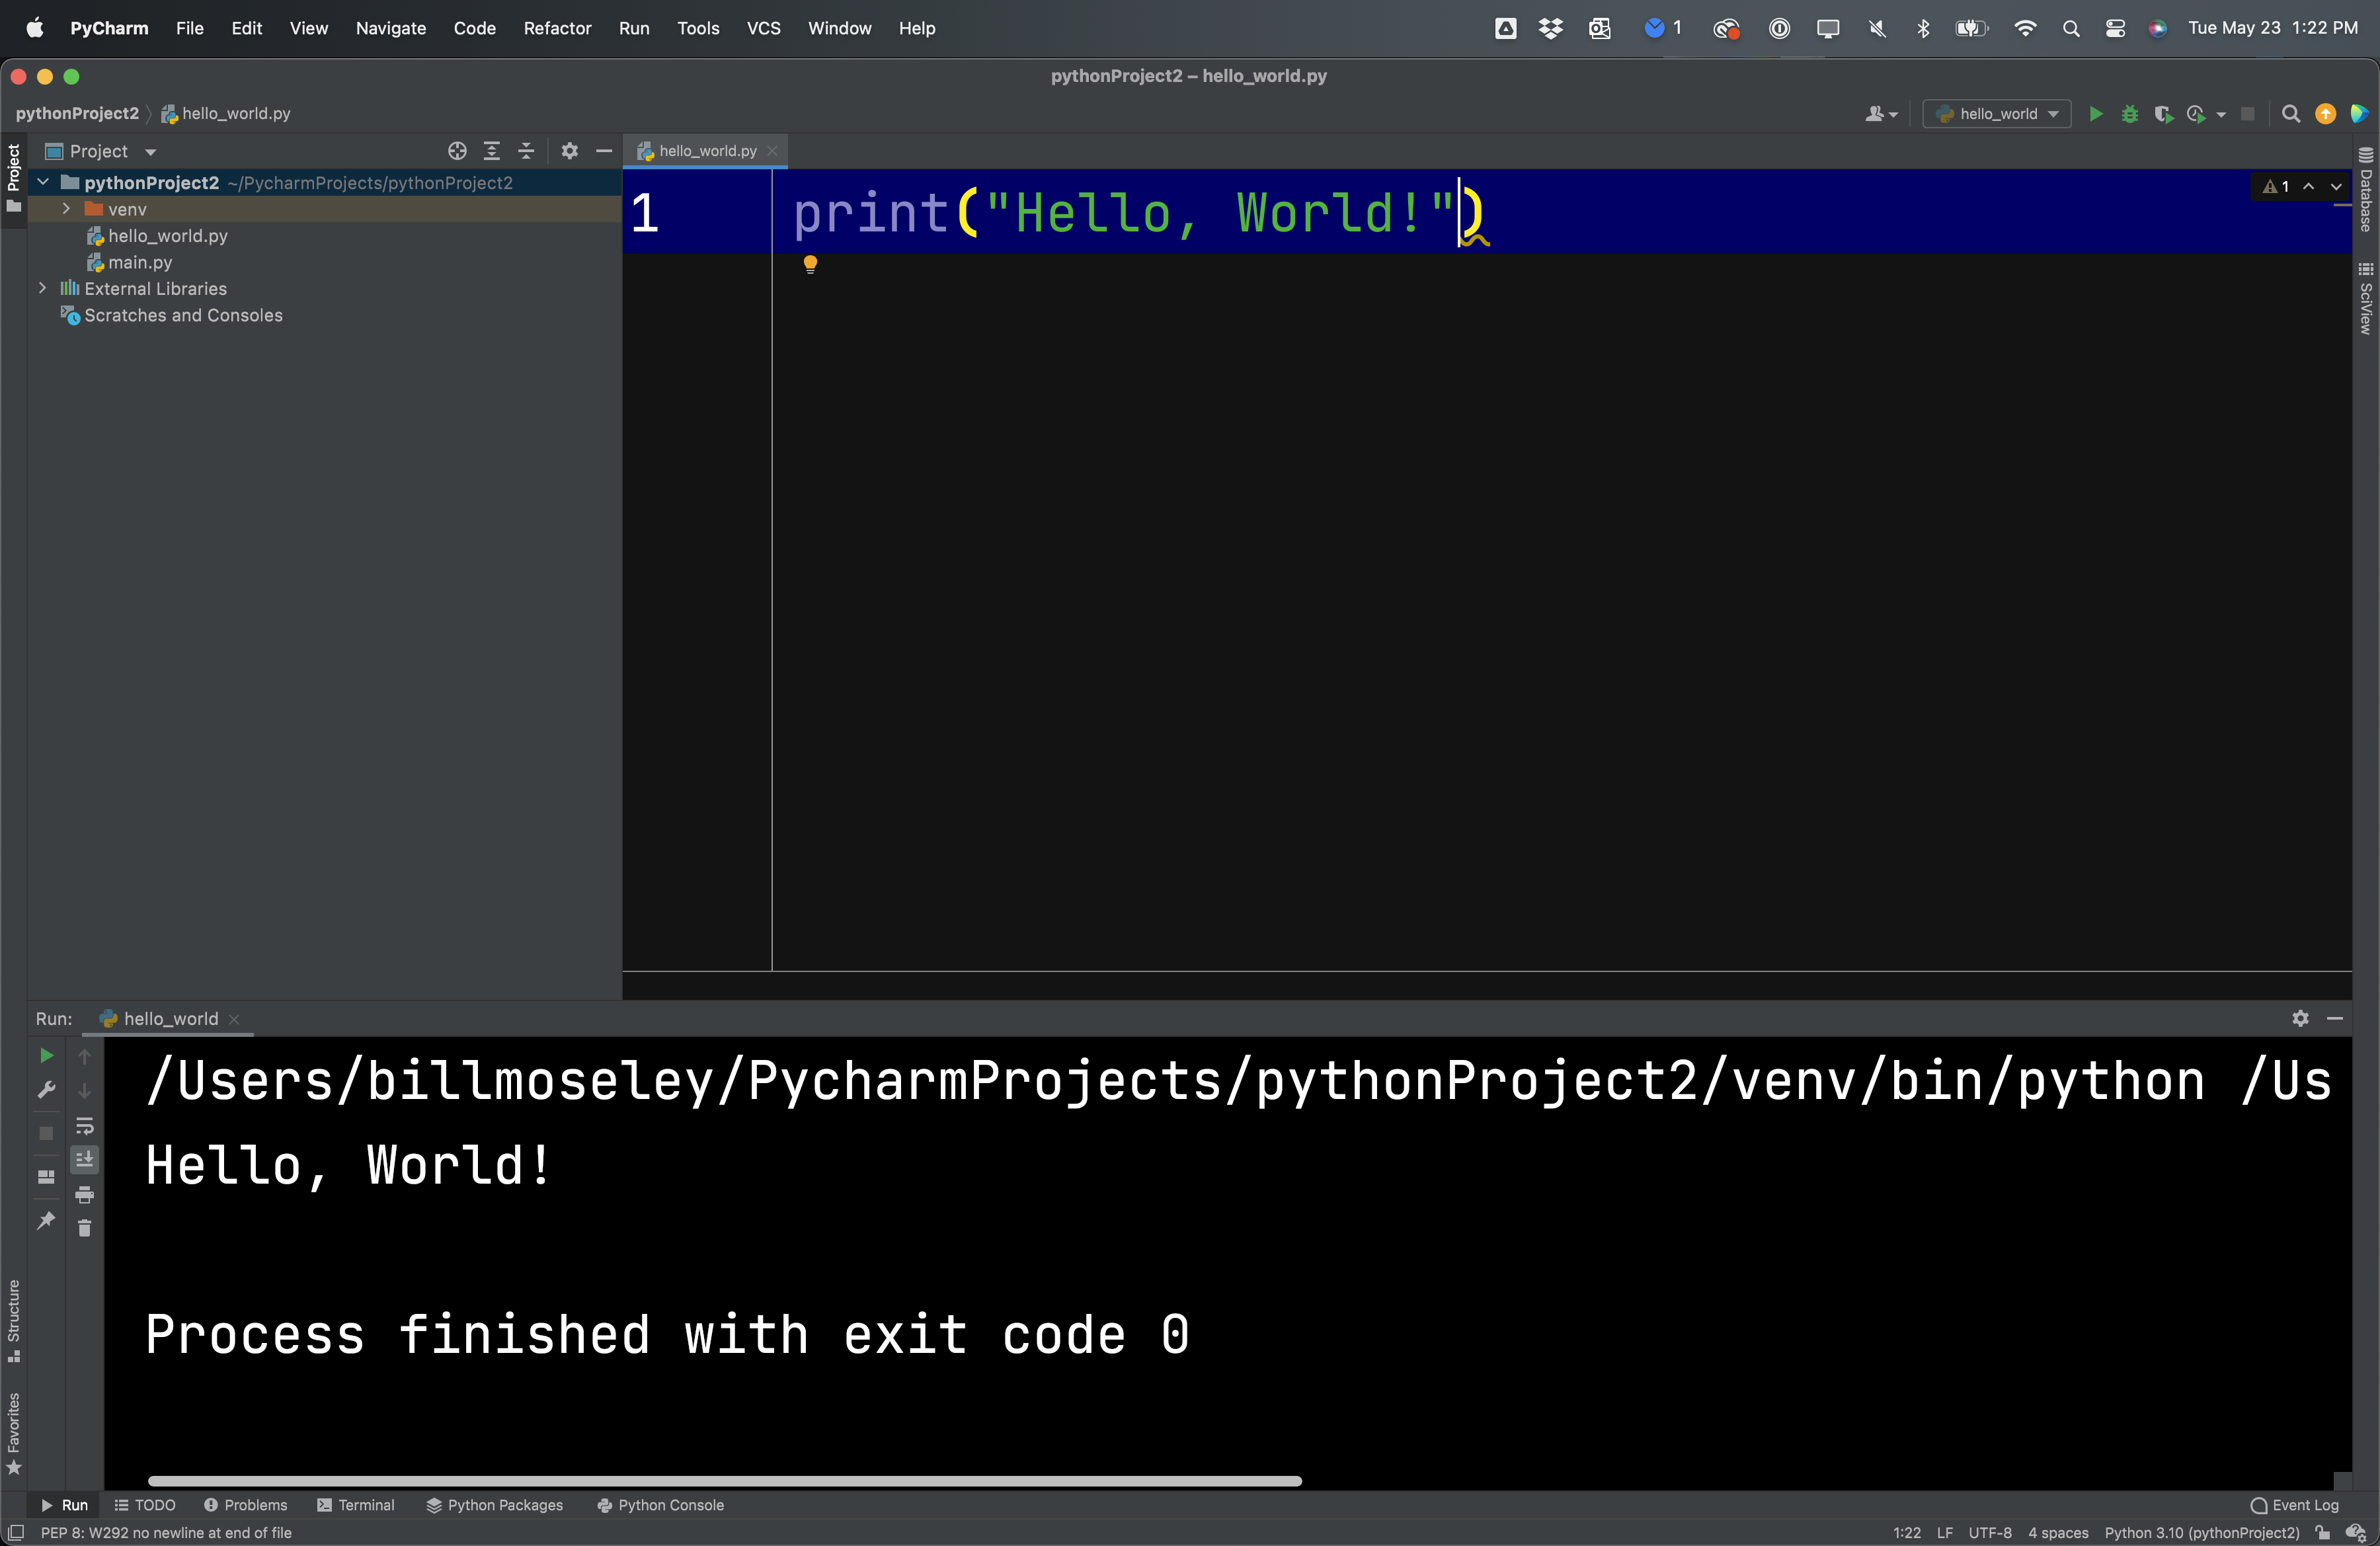
Congratulations! You have successfully run a "Hello World" program in PyCharm. This simple program serves as a starting point for testing your PyCharm installation and ensuring that everything is working correctly. From here, you can explore and build more complex Python projects using PyCharm's features and functionalities.
Videos for Module 1 - Introducing Python
1-1: Introducing Myself and COMP B10 (14:52)
1-2: Syllabus Review (27:50)
1-3: Downloading and Setting Up Tools (7:52)
1-4: Completing A1: Hello World (6:17)
1-5: Submitting a File on Canvas (3:50)
Key Terms for Module 1 - Introducing Python
| Batteries included | Python's comprehensive standard library providing pre-built functionality for various tasks. |
| Code readability | A design philosophy emphasizing clear and understandable code structure in Python. |
| Community | A group of users and developers actively involved in using and improving Python. |
| Community Edition | A free version of PyCharm for basic Python development. |
| Dynamically typed | Variable types are inferred at runtime, providing flexibility in programming. |
| Garbage collection | An automatic memory management feature in Python, handling memory allocation and deallocation. |
| Guido van Rossum | The creator of the Python programming language. |
| High-level language | A programming language that provides abstractions and features to simplify coding compared to lower-level languages. |
| Integrated Development Environment (IDE) | Software that assists in writing and managing code, recommended for Python development. |
| Object-oriented programming (OOP) | A programming paradigm structuring code around objects with attributes and methods, promoting modular and reusable code. |
| Off-side rule | The principle behind significant indentation, ensuring a consistent and readable code structure. |
| Pro version | A paid version of PyCharm with additional features, available for free to students from accredited institutions. |
| Programming paradigms | Approaches to programming styles, including structured, object-oriented, and functional programming. |
| PyCharm | An IDE for Python development, offering features like debugging and code highlighting. |
| Python history | A timeline of major releases and milestones in the development of Python. |
| Significant indentation | Python's use of indentation to define code blocks, enforcing a consistent and readable structure. |
| Stack Overflow Developer Survey | An annual survey indicating Python's popularity and usage statistics among developers. |
Quiz Yourself - Module 1 - Introducing Python
Test your knowledge of this module by choosing options below. You can keep trying until you get the right answer.
Skip to the Next QuestionActivities for this Module
S1 - Online Python Hello World
Go to the web site, online-python.com. Here, you will find a window with two parts. The top part is a Python code editor, and will probably already contain some code. The bottom part of the window is where the results of your code will appear. In between the top and the bottom part, you will see a button that is labeled “Run”.
This web site allows users to write and run simple Python code, and try out a few things without having to install or open up a code editor on your computer. While many of the scripts in this class won’t run properly on this web version of Python, it’s a great resource and a way to get started.
You will still need to install Pycharm to do most of the work for this class, which will require a Windows or Apple computer. However, this resource is something you can use to test ideas or simple code projects from almost any device.
For this sandbox assignment, you will be writing a simple “Hello World” script in the online editor, and running the script to see the result.
Try deleting the existing code in the top box of the online-python.com editor, and typing the following:
print(“Hello World!”)
Click the “run” button, and you should see the words “Hello World!” appear in the results pane at the bottom. To complete this assignment, change the words that Python will print to something with your own name, and click “run” again.